Interactive Disassembler Download: Your Ultimate Guide
Click the interactive disassembler download link. If you don’t see the download link below, contact VCCarTool via WhatsApp: +1 (901) 414 – 1927 for immediate assistance.
Looking for a reliable interactive disassembler download? This comprehensive guide provides everything you need to know about the Interactive Disassembler (IDA), including its benefits, installation process, and how to leverage it for reverse engineering tasks. Get ready to elevate your skills in software analysis, vulnerability detection, and malware investigation with this powerful tool, and discover how VCCarTool can help you streamline the process.
1. Understanding the Interactive Disassembler (IDA)
The Interactive Disassembler (IDA) stands as a cornerstone in the realm of reverse engineering, acting as a sophisticated tool that translates machine-executable code into human-readable assembly language. This conversion is crucial for understanding the inner workings of software, identifying vulnerabilities, and analyzing malicious code. IDA supports a plethora of executable formats across various processors and operating systems, making it a versatile asset for professionals in cybersecurity and software development. Let’s delve deeper into its capabilities and why it’s considered an industry-standard disassembler.
1.1 What Makes IDA a Premier Choice?
IDA’s reputation as a premier choice stems from its robust feature set and adaptability. Its ability to handle a wide range of executable formats, including Windows PE, Mac OS X Mach-O, and Linux ELF, sets it apart from simpler disassemblers. Moreover, IDA functions as a debugger, allowing users to step through code execution, inspect memory, and set breakpoints—critical for dynamic analysis. According to Hex-Rays, the company behind IDA, the software is continuously updated to support the latest processors and file formats, ensuring users have access to cutting-edge analysis capabilities.
1.2 Roles Benefiting from IDA Proficiency
Mastering IDA is essential for various roles within the tech industry. Here are some key professions that rely heavily on reverse engineering skills:
- Incident Responders: Quickly analyze malware and understand the scope of security breaches.
- Malware Analysts: Dissect malicious software to identify its functionality and develop effective countermeasures.
- Penetration Testers: Uncover vulnerabilities in software to prevent exploitation by malicious actors.
- Vulnerability Researchers: Identify and analyze software flaws to improve security.
- Software Developers: Debug and optimize code, understand third-party libraries, and ensure software integrity.
1.3 Free vs. Commercial Versions
IDA is available in both free and commercial versions. The free version offers a solid foundation for learning and basic reverse engineering tasks, but it has limitations compared to the commercial version. The commercial version includes advanced features such as:
- Decompilation: Converts assembly code into C-like pseudocode, making it easier to understand the program’s logic.
- Advanced Debugging: Provides more sophisticated debugging capabilities, including remote debugging and support for more complex debugging scenarios.
- Plugin Support: Allows users to extend IDA’s functionality with custom plugins.
- Support for More File Formats: Handles a wider range of executable formats and architectures.
For professionals requiring in-depth analysis and advanced capabilities, the commercial version is a worthwhile investment. You can explore the different versions and their features on the Hex-Rays website.
 IDA Pro Interface
1.4 Essential Reverse Engineering Skills
Reverse engineering involves dissecting software to understand its structure, functionality, and underlying principles. This process requires a combination of technical skills, analytical thinking, and problem-solving abilities. Here are some key skills essential for effective reverse engineering:
- Assembly Language: Proficiency in reading and understanding assembly code is fundamental.
- Disassemblers and Debuggers: Expertise in using tools like IDA Pro, Ghidra, and OllyDbg to analyze code.
- Operating System Concepts: Understanding how operating systems work, including process management, memory management, and file systems.
- Networking Protocols: Knowledge of network protocols to analyze network-based malware and vulnerabilities.
- Cryptography: Familiarity with cryptographic algorithms and techniques to analyze encrypted software.
- File Format Analysis: Ability to analyze different file formats, such as PE, ELF, and Mach-O.
2. Preparing for IDA Installation on Ubuntu
Before diving into the installation process, ensuring your system meets the necessary requirements is crucial for a smooth experience. This preparation involves verifying your Ubuntu setup, checking internet connectivity, and having the right administrative privileges.
2.1 System Requirements
To successfully install and run IDA on Ubuntu, you’ll need the following:
- Operating System: Ubuntu operating system running on a physical or virtual machine (recommended: Ubuntu 18.04 or later)
- Internet Connection: A stable internet connection to download the IDA packages.
- Administrative Privileges: Sudo or root access to install software and dependencies.
- Hardware:
- Processor: Intel Pentium 4 or later.
- Memory: At least 2 GB of RAM (4 GB recommended).
- Disk Space: At least 5 GB of free disk space for installation.
- Virtual Machine (Optional): If using a virtual machine, ensure you have a reliable hypervisor like VMware or VirtualBox.
2.2 Installing Dependencies
To avoid common installation errors, updating and reinstalling essential libraries is a good practice. This ensures all necessary components are present and compatible with IDA.
sudo apt-get update
sudo apt-get install --reinstall libxcb-xinerama0
This command updates the package list and reinstalls the libxcb-xinerama0 library, which is known to cause issues during IDA installation if not properly configured.
 Installing libxcb-xinerama0 Dependency
2.3 Verifying System Readiness
Before proceeding, verify that your system meets the requirements by checking the Ubuntu version, available disk space, and internet connectivity.
- Check Ubuntu Version:
lsb_release -a- Check Disk Space:
df -h- Check Internet Connectivity:
ping google.comIf all checks pass, you’re ready to download and install IDA.
3. Interactive Disassembler Download and Installation
The next phase involves downloading the IDA Free version and executing the installation. Follow these steps carefully to ensure a successful setup.
3.1 Downloading IDA Free for Linux
- Visit the Hex-Rays Website:
Go to the official IDA Free download page. - Download the Linux Version:
Locate and download the ‘IDA Free for Linux’ installation file. - Verify the Download:
Ensure the file is completely downloaded before proceeding to the next step.
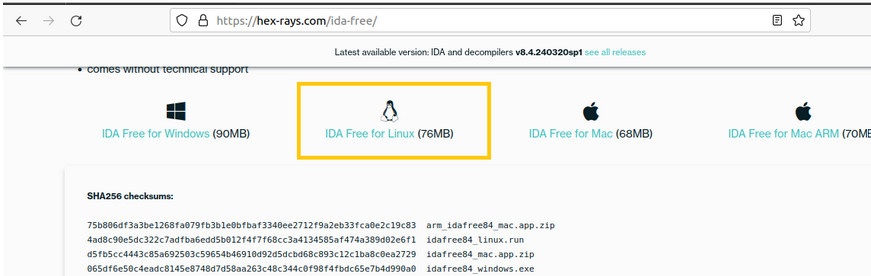 IDA Free Download Page
3.2 Providing Necessary Permissions
Once the download is complete, navigate to the directory containing the downloaded file using the terminal. Grant execute permissions to the installation file.
cd Downloads  # Or the directory where you saved the file
chmod +x idafree84_linux.run
This command makes the installation file executable, allowing you to run it.
3.3 Starting the Installation Process
Execute the installation file using the following command:
./idafree84_linux.runThis command launches the IDA installation wizard. Follow the on-screen prompts, accepting the license agreement and choosing the installation directory.
 IDA Installation Wizard
3.4 Completing the Installation
After following the installation wizard, click Finish to complete the installation. If there are no errors, IDA is now successfully installed on your Ubuntu system.
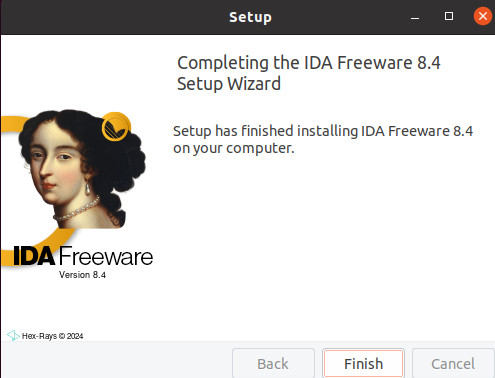 Finishing IDA Installation
4. Launching and Testing IDA
With IDA installed, it’s time to launch the application and test its functionality. This step ensures that IDA is working correctly and that you can start using it for reverse engineering tasks.
4.1 Launching IDA
Navigate to the installation directory and launch IDA. By default, IDA is installed in the user’s home directory.
cd /home/<username>/idafree-8.4  # Replace <username> with your username
./ida64
This command launches the 64-bit version of IDA. If you prefer the 32-bit version, use ./ida.
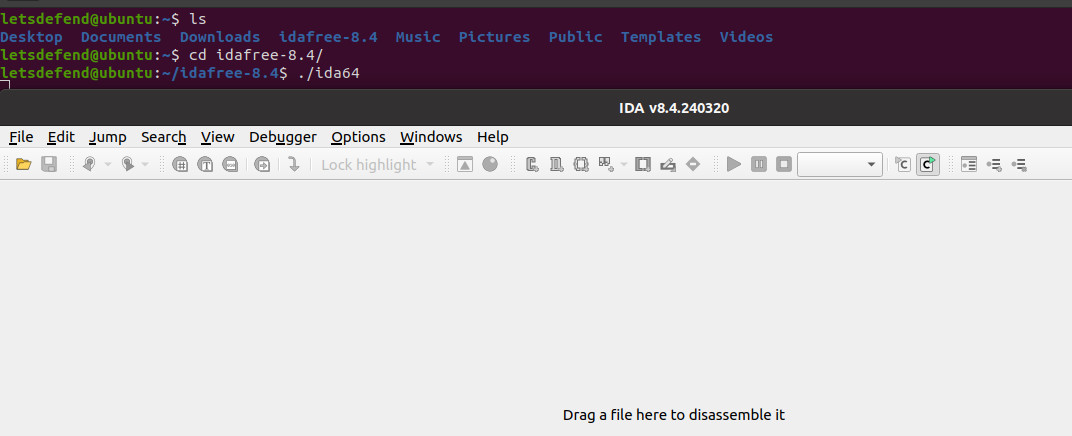 Launching IDA from Terminal
4.2 Opening a Sample Executable
To verify that IDA is functioning correctly, open a sample Linux executable. A common choice is the wget program.
- Copy the Executable:
cp /usr/bin/wget /home/<username>/Desktop # Replace <username> with your username- Open IDA:
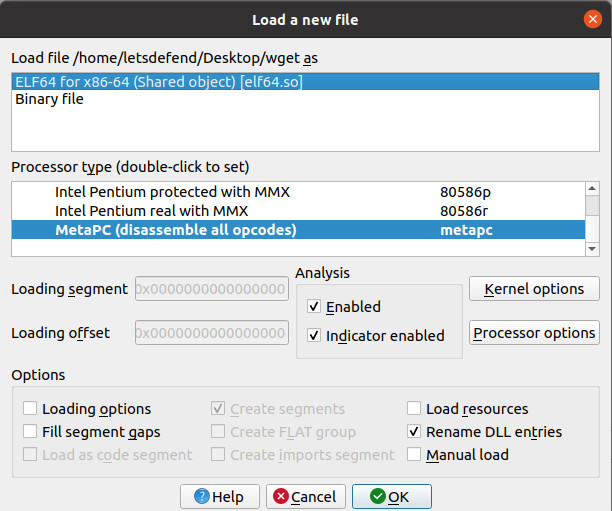
Launch IDA and select File > Open. - Choose the Executable:
Navigate to your desktop and select thewgetexecutable.
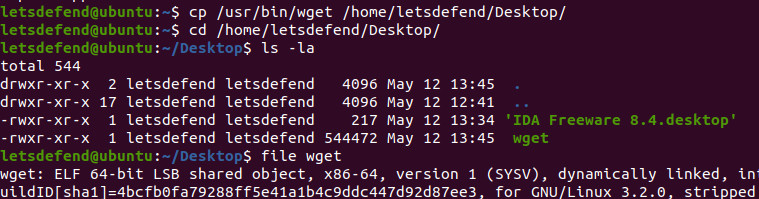 Opening wget Executable with IDA
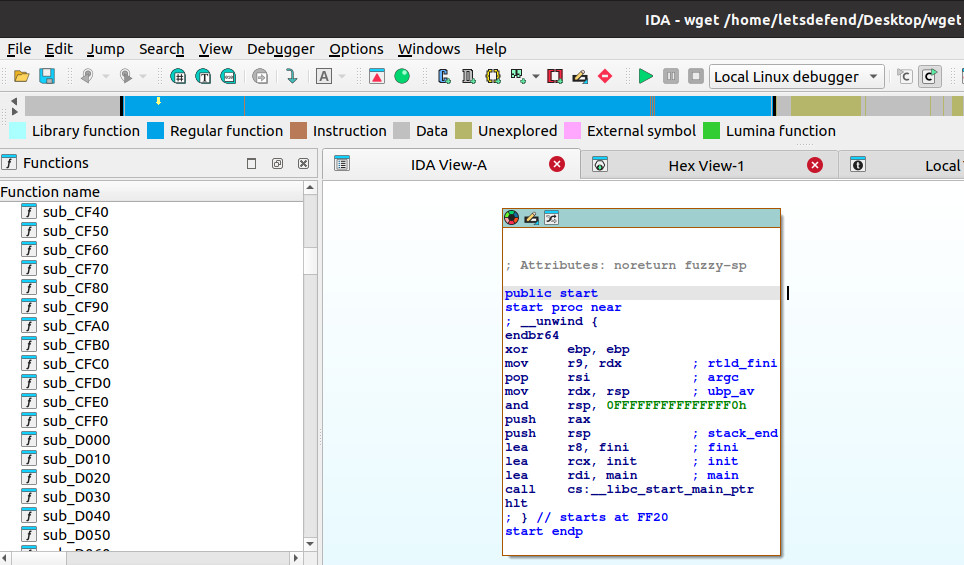
4.3 Analyzing the Executable
Once the executable is open, IDA will disassemble the code and display it in assembly language. You can now explore the program’s functions, data structures, and control flow.
 Analyzing wget in IDA
If you can successfully open and analyze the wget executable, IDA is installed and working correctly.
5. Advanced Usage and Tips for IDA
To maximize your efficiency with IDA, mastering some advanced features and best practices is essential. These tips can help you navigate complex codebases and extract meaningful insights.
5.1 Utilizing IDA’s Decompiler
One of IDA’s most powerful features is its decompiler, which converts assembly code into C-like pseudocode. This simplifies the reverse engineering process by making the code more readable and understandable.
- Enable Decompilation:
Open an executable in IDA and press F5 to activate the decompiler. - Analyze Pseudocode:
Review the generated pseudocode to understand the program’s logic. - Refine Analysis:
Use the pseudocode as a starting point for more detailed analysis, focusing on critical functions and data structures.
5.2 Leveraging Plugins
IDA supports a wide range of plugins that extend its functionality. Plugins can automate tasks, add support for new file formats, and provide specialized analysis tools.
- Explore Available Plugins:
Visit the Hex-Rays website or other reputable sources to find plugins that suit your needs. - Install Plugins:
Follow the plugin’s installation instructions, typically involving copying the plugin files to IDA’s plugins directory. - Use Plugins:
Access the plugin’s features through IDA’s menu or toolbar.
5.3 Effective Debugging Techniques
IDA’s debugger allows you to step through code execution, inspect memory, and set breakpoints. These capabilities are invaluable for dynamic analysis and understanding how a program behaves at runtime.
- Set Breakpoints:
Place breakpoints at strategic locations in the code to pause execution and examine the program’s state. - Step Through Code:
Use the step-over, step-into, and step-out commands to navigate the code execution flow. - Inspect Memory:
View the contents of memory locations to understand data structures and variables.
5.4 Customizing IDA’s Interface
Tailoring IDA’s interface to your preferences can improve your workflow and productivity. Customize the layout, fonts, and colors to create a comfortable and efficient working environment.
- Adjust Layout:
Rearrange the windows and panels to suit your analysis style. - Change Fonts and Colors:
Modify the fonts and colors to improve readability and reduce eye strain. - Configure Shortcuts:
Customize keyboard shortcuts to streamline common tasks.
6. Troubleshooting Common Installation Issues
Even with careful preparation, you might encounter issues during the installation process. Here are some common problems and their solutions.
6.1 Missing Dependencies
If IDA fails to start due to missing dependencies, use the following command to install them:
sudo apt-get install <dependency-name>Replace <dependency-name> with the name of the missing library.
6.2 Permission Errors
If you encounter permission errors while running the installation file, ensure you have granted execute permissions using the chmod +x command.
6.3 Compatibility Issues
If you experience compatibility issues with your Ubuntu version, consider using a virtual machine with a supported version of Ubuntu.
6.4 Installation Fails
If the installation fails, try downloading the installation file again to ensure it is not corrupted. Also, check the installation logs for any error messages that might provide clues about the cause of the failure.
7. Why Choose VCCarTool for Your Automotive Diagnostic Needs
At VCCarTool, we understand the critical role that diagnostic and programming software plays in modern automotive repair. Our mission is to provide top-tier software solutions that empower technicians and garage owners to efficiently diagnose and repair vehicles, reducing downtime and enhancing customer satisfaction.
7.1 Comprehensive Software Solutions
VCCarTool offers a wide range of diagnostic and programming software tailored to meet the diverse needs of the automotive industry. Whether you’re a seasoned technician or a garage owner, our software solutions provide the tools you need to tackle even the most complex automotive issues.
7.2 Expert Support and Guidance
We go beyond just providing software. Our team of experienced professionals offers expert support and guidance to help you navigate the complexities of automotive diagnostics and programming. We are committed to ensuring that you have the knowledge and resources you need to succeed.
7.3 Streamlined Software Access
VCCarTool simplifies the process of acquiring and installing essential software. We understand that time is money, which is why we offer rapid download assistance and licensing support. Contact us via WhatsApp: +1 (901) 414 – 1927 for immediate assistance with downloads and license activation.
7.4 Meeting Customer Challenges
We recognize the numerous challenges faced by automotive technicians and garage owners, including:
- Keeping up with ever-evolving automotive technology.
- Finding reliable diagnostic and programming tools.
- Minimizing repair times and maximizing efficiency.
- Ensuring accurate and safe repairs.
VCCarTool is dedicated to helping you overcome these challenges by providing cutting-edge software solutions and expert support.
8. Call to Action: Contact VCCarTool Today
Ready to revolutionize your automotive diagnostic capabilities? Contact VCCarTool today and discover how our software solutions and expert support can transform your business.
Reach out to us via:
- WhatsApp: +1 (901) 414 – 1927
- Email: [email protected]
- Website: vccartool.com
Our team is standing by to answer your questions and help you find the perfect tools for your needs. Don’t let outdated software hold you back – partner with VCCarTool and drive your business forward.
9. FAQs About Interactive Disassembler Download
9.1 What is the Interactive Disassembler (IDA)?
The Interactive Disassembler (IDA) is a powerful software tool used for reverse engineering, malware analysis, and vulnerability detection. It converts machine-executable code into assembly language, making it easier to understand the program’s inner workings.
9.2 Is IDA free to use?
IDA is available in both free and commercial versions. The free version has limited features compared to the commercial version, which includes advanced capabilities like decompilation and plugin support.
9.3 What operating systems does IDA support?
IDA supports multiple operating systems, including Windows, macOS, and Linux. This guide focuses on installing IDA on Ubuntu.
9.4 What are the system requirements for installing IDA on Ubuntu?
The system requirements include Ubuntu operating system, a stable internet connection, administrative privileges, an Intel Pentium 4 processor or later, at least 2 GB of RAM, and 5 GB of free disk space.
9.5 How do I download IDA for Linux?
You can download IDA Free for Linux from the Hex-Rays website (https://hex-rays.com/ida-free/).
9.6 How do I install IDA on Ubuntu?
To install IDA on Ubuntu, download the installation file, grant execute permissions using chmod +x <filename>.run, and then run the file using ./<filename>.run. Follow the on-screen prompts to complete the installation.
9.7 What should I do if I encounter errors during installation?
If you encounter errors, ensure you have installed all necessary dependencies, have the correct permissions, and are using a compatible version of Ubuntu. Check the installation logs for specific error messages.
9.8 How do I launch IDA after installation?
Navigate to the installation directory in the terminal and run ./ida64 for the 64-bit version or ./ida for the 32-bit version.
9.9 How can VCCarTool help with automotive diagnostic software?
VCCarTool provides comprehensive software solutions, expert support, and streamlined access to diagnostic and programming tools for the automotive industry. Contact us via WhatsApp: +1 (901) 414 – 1927 for immediate assistance.
9.10 Where can I get assistance if I have trouble downloading or licensing software from VCCarTool?
You can reach out to VCCarTool via WhatsApp: +1 (901) 414 – 1927, email at [email protected], or visit our website at vccartool.com for prompt and reliable support.