Camshaft Position Sensor Replacement: How to fix
Is your vehicle acting a little off lately Perhaps it’s experiencing rough idling, stalling, or a general lack of power. A faulty camshaft position sensor might be the culprit. At VCCarTool, we understand the importance of keeping your vehicles running smoothly and your garage operating efficiently. That’s why we’ve put together this comprehensive guide on camshaft position sensor replacement, empowering you with the knowledge and tools you need to tackle this common issue with confidence.
1. Understanding the Vital Role of Your Camshaft Position Sensor
The camshaft position sensor, often referred to as the CMP sensor, is a small but mighty component in your vehicle’s engine management system. Its primary function is to monitor the rotational speed and precise position of the camshaft. This crucial information is then relayed to the engine control unit (ECU) or powertrain control module (PCM), which uses it to accurately time fuel injection and ignition events. Think of it as the engine’s internal clock, ensuring everything happens at precisely the right moment for optimal performance and fuel efficiency. Without a properly functioning camshaft sensor, your engine’s timing can be thrown off, leading to a variety of performance problems.
2. Recognizing the Tell-Tale Signs of a Failing Camshaft Sensor
Detecting a failing camshaft position sensor early can save you time, money, and potential further engine damage. Here are some common symptoms to watch out for:
-
Check Engine Light Illumination: This is often the first and most obvious indicator. Your vehicle’s ECU will likely log a diagnostic trouble code (DTC) related to the camshaft sensor.
-
Rough Idling: The engine may vibrate excessively or feel unsteady when the vehicle is stopped or idling.
-
Engine Stalling: The engine might suddenly shut off, especially at low speeds or when coming to a stop.
-
Difficulty Starting: The engine may crank for a longer time than usual or fail to start at all.
-
Loss of Engine Power: You might notice a decrease in acceleration and overall engine responsiveness.
-
Poor Fuel Economy: Inefficient timing can lead to increased fuel consumption.
-
Engine Misfires: The engine may run unevenly, with noticeable jerking or sputtering.
If you observe any of these symptoms, it’s crucial to perform a thorough diagnosis, which may include testing the camshaft position sensor.
3. Diagnosing a Faulty Camshaft Position Sensor: A Step-by-Step Approach
Before rushing to replace the camshaft sensor, it’s wise to confirm that it is indeed the source of the problem. Here’s a general guide on how to approach the diagnosis:
-
Retrieve Diagnostic Trouble Codes (DTCs): Using an OBD-II scanner, read the DTCs stored in the ECU/PCM. Codes like P0340, P0341, P0342, P0343, and P0344 are commonly associated with camshaft position sensor issues. High-quality scan tools from VCCarTool can make this process quick and efficient.
-
Visual Inspection: Carefully examine the camshaft position sensor and its wiring. Look for any signs of physical damage, such as cracks, breaks, or corrosion. Ensure the electrical connector is securely attached.
-
Testing the Sensor’s Resistance: Using a multimeter, you can test the resistance of the camshaft position sensor. Consult your vehicle’s repair manual for the specific resistance values. An abnormal reading suggests a faulty sensor. According to automotive diagnostic experts, typical resistance values can range from a few hundred to a few thousand ohms, but this varies greatly depending on the sensor type and manufacturer (Haynes Manuals).
-
Checking the Sensor’s Signal Output: With the engine running (if possible), you can use an oscilloscope or a multimeter set to AC voltage to check the sensor’s signal output. The signal should be a consistent waveform or voltage pulse that changes as the camshaft rotates. An erratic or absent signal indicates a problem. Advanced diagnostic tools available at VCCarTool provide precise readings and waveform analysis capabilities.
-
Inspect the Crankshaft Position Sensor: In some cases, symptoms of a failing crankshaft position sensor can mimic those of a faulty camshaft sensor. It’s good practice to check both, as they work in tandem for proper engine timing (Motor Magazine).
4. Gathering Your Tools and Preparing for the Replacement
Once you’ve confirmed that the camshaft position sensor needs replacing, gathering the necessary tools and preparing the work area is essential for a smooth and efficient job. Here’s a typical list:
-
New Camshaft Position Sensor: Ensure you have the correct replacement sensor for your specific vehicle make, model, and year. Refer to your vehicle’s parts catalog or VIN for accurate identification. VCCarTool can connect you with reliable suppliers.
-
Basic Hand Tools: This will likely include wrenches, sockets, and screwdrivers of various sizes to remove the old sensor and install the new one. A set like the VCCarTool Professional Mechanic’s Toolkit offers a comprehensive selection of high-quality tools.
-
Ratchet and Extension: These will help you access the sensor if it’s located in a tight or hard-to-reach area.
-
Torque Wrench: For ensuring the new sensor is tightened to the manufacturer’s specified torque, preventing damage or loosening. Refer to your vehicle’s repair manual for the correct torque specifications, typically measured in Newton-meters (Nm) or pound-feet (lb-ft). For instance, some manufacturers might specify a torque of 8-12 Nm.
-
OBD-II Scanner: To clear any diagnostic trouble codes after the replacement.
-
Safety Glasses and Gloves: To protect yourself during the repair process.
-
Vehicle Repair Manual: This provides specific instructions and diagrams for your vehicle. Reputable sources include Haynes and Chilton manuals.
Investing in quality tools from VCCarTool not only makes the job easier but also ensures accuracy and longevity of your repairs, ultimately boosting your efficiency and customer satisfaction.
5. Step-by-Step Guide to Camshaft Position Sensor Replacement: How to
Now, let’s walk through the process of replacing the camshaft position sensor. Always consult your vehicle’s repair manual for specific instructions and safety precautions before starting.
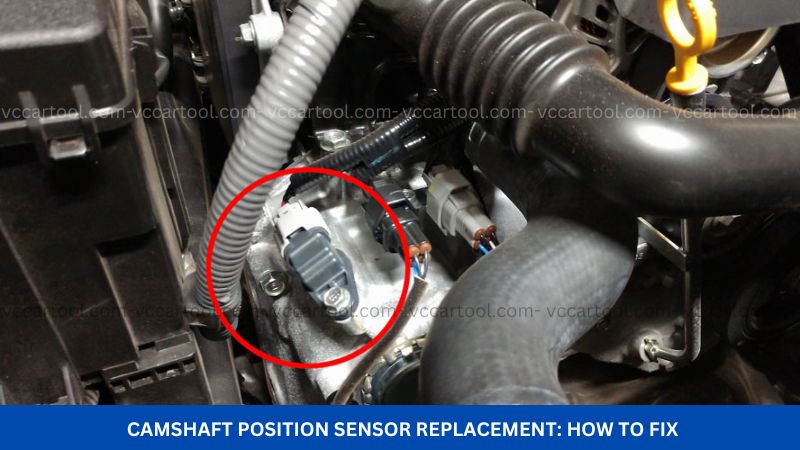
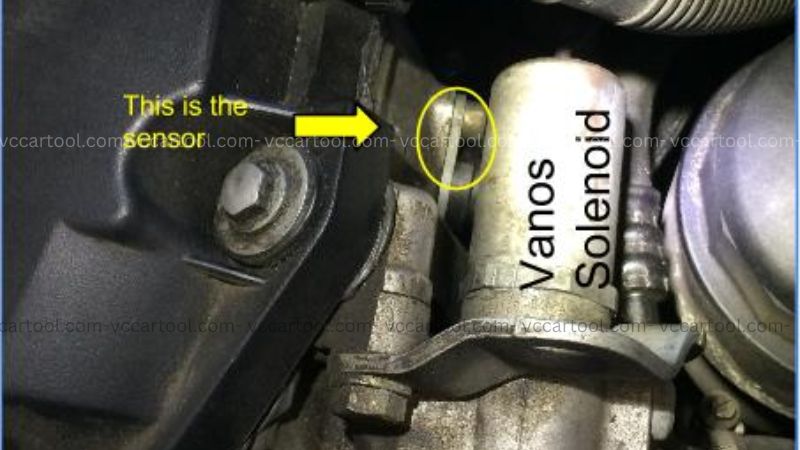
Step 1: Locate the Camshaft Position Sensor: The location of the camshaft position sensor can vary depending on your vehicle’s make and model. It’s often found on the cylinder head, near the camshaft or valve cover. Your repair manual will provide a precise diagram.
Step 2: Disconnect the Negative Battery Terminal: This is a crucial safety step to prevent electrical shorts during the repair. Use a wrench to loosen the nut on the negative battery terminal and carefully remove the cable.
Step 3: Disconnect the Electrical Connector: Gently press the release tab on the camshaft position sensor’s electrical connector and pull it off. Be careful not to damage the connector or wiring.
Step 4: Remove the Old Sensor: The camshaft position sensor is typically held in place by one or two bolts. Use the appropriate socket or wrench to carefully remove these bolts. Once the bolts are removed, gently wiggle and pull the old sensor out. Note its orientation for installing the new one correctly.
Step 5: Install the New Sensor: Align the new camshaft position sensor with the mounting hole and push it in until it sits flush. Secure it with the bolts you removed earlier. Tighten the bolts to the manufacturer’s specified torque using your torque wrench. Over-tightening can damage the sensor.
Step 6: Reconnect the Electrical Connector: Plug the electrical connector back onto the new camshaft position sensor until it clicks into place. Ensure it is securely attached.
Step 7: Reconnect the Negative Battery Terminal: Reattach the negative battery cable to the battery terminal and tighten the nut securely.
Step 8: Clear Diagnostic Trouble Codes: Use your OBD-II scanner from VCCarTool to clear any DTCs that may have been triggered by the faulty sensor or the replacement process.
Step 9: Start the Engine and Test: Start your vehicle’s engine and let it run for a few minutes. Check for any warning lights on the dashboard and ensure the engine is running smoothly without any of the previous symptoms.
6. Why Choose VCCarTool for Your Automotive Tool Needs?
At VCCarTool, we understand the demands of your profession. You need reliable, high-quality tools that can withstand daily use and help you perform repairs efficiently and accurately. Here are just a few reasons why automotive technicians and garage owners trust VCCarTool:
-
Wide Selection of Professional-Grade Tools: From advanced diagnostic scanners and oscilloscopes to comprehensive hand tool sets and specialized equipment, VCCarTool offers a vast inventory to meet all your needs.
-
Durability and Reliability: We source our tools from reputable manufacturers known for their quality and durability, ensuring a long lifespan and dependable performance in your busy garage.
-
Latest Technology: VCCarTool stays ahead of the curve, offering tools equipped with the latest automotive technology to help you diagnose and repair even the most complex modern vehicles.
-
Competitive Pricing: We understand budget considerations and strive to offer competitive prices on all our products, providing excellent value for your investment.
-
Exceptional Customer Support: Our knowledgeable team is always ready to assist you with product selection, technical support, and any questions you may have. We’re committed to your success.
Investing in the right tools is an investment in your business’s efficiency, profitability, and reputation. Equip your garage with the best – choose VCCarTool.
7. Optimizing Your Garage Operations with the Right Equipment
For garage owners and managers, efficiency and productivity are paramount. Providing your technicians with high-quality tools and equipment not only streamlines the repair process but also enhances the quality of service you can offer your customers. By investing in advanced diagnostic tools from VCCarTool, you can:
-
Reduce Diagnostic Time: Quickly and accurately identify the root cause of vehicle issues, saving valuable time and labor costs.
-
Improve Repair Accuracy: Ensure repairs are done right the first time, minimizing comebacks and maximizing customer satisfaction.
-
Expand Service Offerings: Equip your team to handle a wider range of automotive problems, increasing your revenue potential.
-
Boost Technician Morale: Providing your team with modern, reliable tools can improve their job satisfaction and productivity.
Don’t let outdated or unreliable equipment hold your garage back. Partner with VCCarTool to equip your business for success in today’s competitive automotive repair market.
8. Connecting with VCCarTool for Immediate Tool Solutions
Ready to upgrade your toolkit and experience the VCCarTool difference? We’re here to help you find the perfect tools to meet your specific needs and budget. Whether you’re a young mechanic just starting out or an experienced garage owner looking to optimize your operations, our team is ready to assist.
Contact us today to discuss your tool requirements and discover how VCCarTool can empower your automotive repair endeavors.
- WhatsApp: +1 (901) 414 – 1927
- Website: vccartool.com
Our commitment is to provide you with the highest quality automotive tools and exceptional customer service, ensuring you have everything you need to excel in your profession. Reach out now and let us help you take your automotive repair capabilities to the next level. Explore our range of diagnostic equipment, hand tools, and specialized instruments designed for peak performance and lasting reliability. Get in touch with VCCarTool and elevate your service today.
You may be interested in: